Add a Student Group
Student groups should be named so that other Portal users can clearly distinguish one student group from another. The student group name and teacher name should be unique to the district and school selected.
Student Group Name Recommendation: <Program> <Teacher Name> <Class Time/Session> or another name that best describes the students in the group. Example: InView Level 1 Joe Garza 2nd Period.
![]()
- On the Manage Student Groups window, click Add Student Group. The Add Student Group window displays.
- Enter a Group Name for the student group.
- Select a new teacher from the dropdown menu or click Add to add a teacher to the Portal, then select the teacher for the student group.
- Enter search criteria and click Find Students. The students that meet your criteria display in the Available Students column.
- Select a student and double-click to edit the student’s information, or use the Add Selected (
 ), Remove Selected (
  ), Add All (
  ), and Remove All (
  ) icons with the Available Students and Students in Session lists to select one or more students to remove or add.
Note: To select multiple students in sequence, press the Shift key, select the students, and click the mouse button. To select multiple students not in sequence, press the Ctrl key, select the students, and click the mouse button. - Click Save to save your changes or Cancel to cancel them.
Note: You can filter by Teacher to return all students who have been associated to a student group for the selected teacher.
The Manage Student Groups Window
Portal users can search for student groups, copy, edit, and delete student groups from the Mange Student Groups window.
- Click Student Group Management to display the Manage Student Groups page.
- To search for one or more student groups, use the various drop-down menus and fields to enter search criteria and click Find Student Groups.
- Student groups that match your search criteria display at the bottom go the window. Click the View/Edit icon (
 ) in the Action column for the student group whose information you want to edit. The Edit Student Group window displays. For details about how to use the Edit Student window, see “Editing Student Group Information” on page 76 for more information.
Click the Delete icon ( ![]() ) to delete a student group.
) to delete a student group.
Editing Student Group Information
The Edit Student Group window allows you to edit student group details and add or remove students from a group. You also can select (or add then select) a teacher for a group. When your changes are complete, you can save them or save them and add the group to a test session.

- You can search for and add available students to the student group.
- You can add students to the Portal, and then add them to student groups.
- You can select a new teacher from the dropdown menu or click Add to add a teacher to the Portal, then select the teacher for the student group.
- Click Save to save your changes or Cancel to cancel your changes.
- Click Save & Add to Session to save your changes to the group and then add a test session.
Reassign a Teacher to Multiple Student Groups
You can perform this procedure any time a new teacher needs to be assigned to existing student groups. Note: Perform this procedure prior to deleting a teacher from the Portal. Deleting a teacher will delete all student groups tied to that teacher.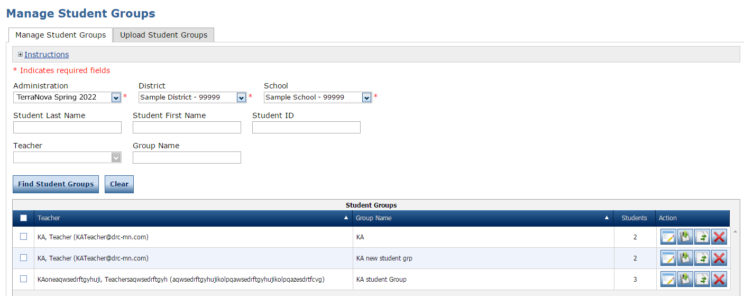
- On the Manage Student Groups window, select the student groups to reassign and click Reassign Group. The Assign Teacher to Student Groups dialog displays.
- On the Assign Teacher to Student Groups window, select the teacher for the selected student groups and click Assign.
Uploading Multiple Student Groups to the Portal
To upload multiple student group records at once, you can upload a file containing student group information to the Portal. The file must be in the comma‑separated value (.csv) format and the fields in the file must be in specific columns.
![]()
- Click Student Group Management to display the Manage Student Groups page. Select the Upload Student Groups tab.
- The Upload Student Groups tab contains links to both a sample PDF file that contains instructions and a sample .csv file that you can use to create the actual file.
Click the Download the File Layout link to display the UploadStudentGroupsLayout—Terra Nova.pdf file.
This file displays the required layout of the .csv file you will upload to DRC with rules, instructions, and examples describing how to create and format the file. - Click the Sample File link to download or display the SampleStudentGroupsFile.csv file. This file is only a sample of the type of file you will upload to DRC. Depending on the browser you are using, a dialog box may appear for you to use to open or download the file.
- Use the SampleStudentGroupsFile.csv file to create, rename, and save a student group file to upload. Note: Be sure to keep the header column rows in the file you upload.
- After you have created a students file, click Browse... to locate it, select the file, and click Open to display it in the File field of the Upload Student Groups tab.
- Click Upload. A message displays indicating the file has been transferred and is being checked for errors. After the file has been validated, you can review its status. If the file contains errors, you must correct them and repeat Steps 5 and 6.