The Manage Test Sessions Option
From the Test Management menu, you can view all of the test sessions for a specific district or school.
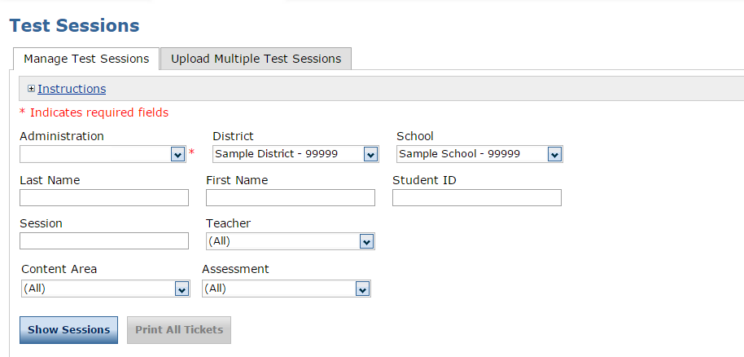
- Click My Applications and Manage Test Sessions. The Test Sessions page displays.
- To view the status of test sessions, enter your search criteria, and click Show Sessions. The Session Detail page displays.
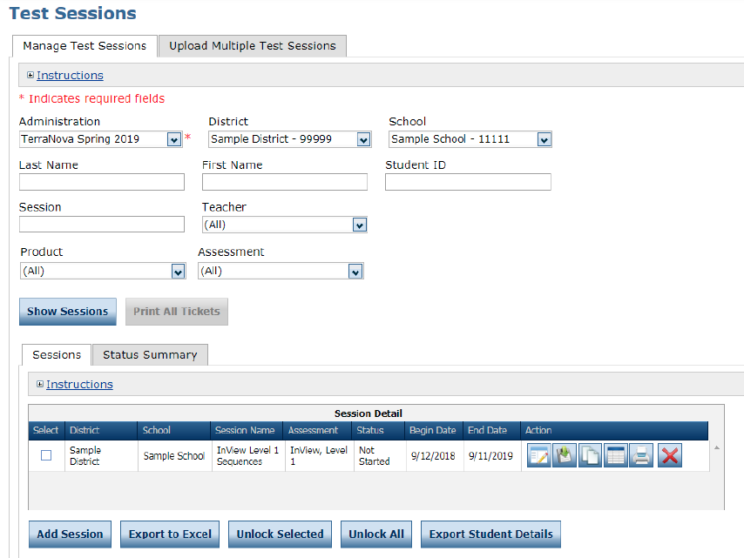
From the Test Sessions page, you can view all of the test sessions for a specific district or school. The Session Detail portion of the window displays the status of the session—Not Started, In Progress, or Completed.
| Status | Description |
|
Not Started |
No student in the test session has started the test. |
|
In Progress |
The test session is in progress (at least one student in the session has begun testing). |
|
Completed |
The test session is finished. All of the students in the session have completed the test. The begin date and end date also display. |
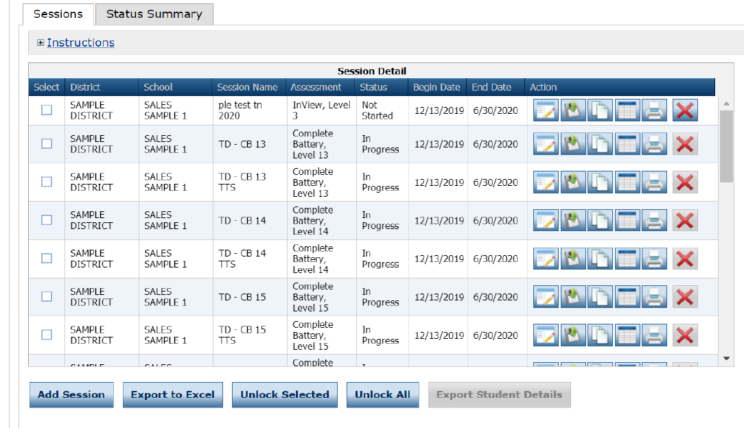
- The Status column display test session status.
- Using the buttons on the bottom of the Test Sessions page, you can add and work with test sessions.
Creating a Test Session
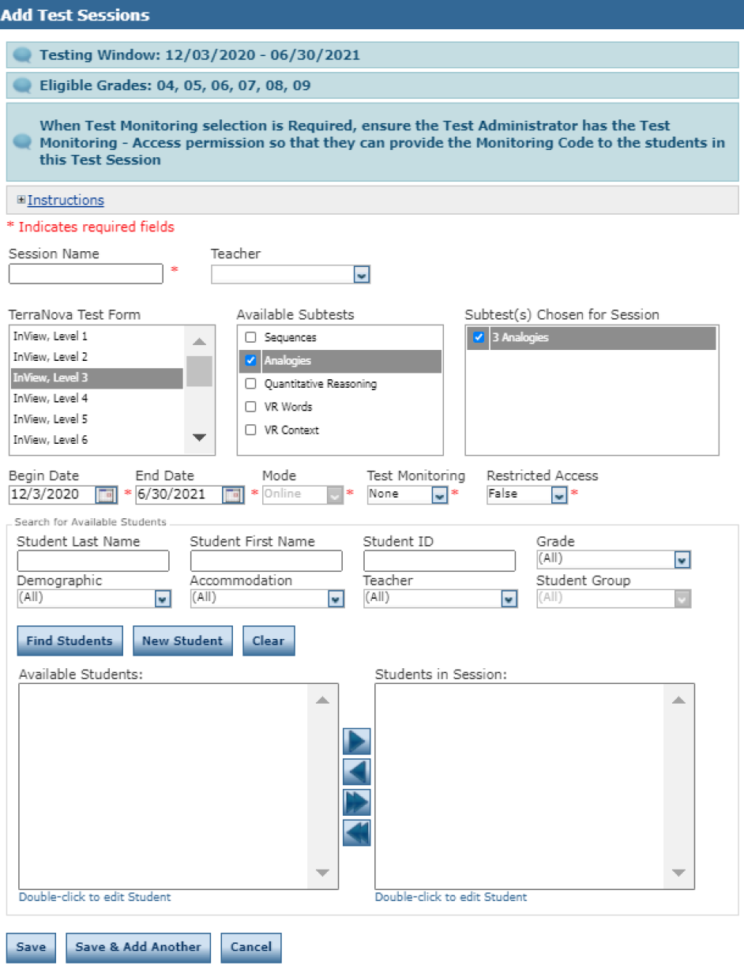
You can create a new test session and add individual students or student groups (that already exist) to it. You must give the session a name and select the Test Form and Subtests for the session. Important: Be sure to select all applicable subtests.
For searching and reporting purposes, use a meaningful test session name that includes the Subtest areas and Level(s), such as: Complete Battery Level 13 Reading.
Note: All students included in a test session take the same test. Create separate test sessions with different combinations of students and TerraNova Forms as needed.
Tip: Prior to creating test sessions, make sure Teachers have been added to the Portal via the User Management menu, then added as Teacher via the Teacher Management menu, and have set up student groups for testing.
- To add a test session, click Test Management and Manage Test Sessions. The Test Sessions page displays.
- Select an administration, district, and school (required to add a test session) and click the Add Session button at the bottom of the page. The Add Test Session window (shown on the following page) displays.
- Enter a name in the Session Name field.
- If needed, update the Begin Date and End Date.
Note: These are the dates that control when the students can access INSIGHT. - First, read the Instructions at the top of this page, then select a TerraNova Test Form, Available Subtests, and Subtest(s) Chosen for the Session.
- Enter any student search criteria and click Find Students.
- Select a student from the Available Students list.
Note: To select multiple students in sequence, press the Shift key while you select them. To select multiple students that are not in sequence, press the Ctrl key while you select them. - Use the Add Selected (
 ), Remove Selected (
  ), Add All (
 ), and Remove All (
 ) icons with the Available Students and Students in Session lists to select one or more students to remove from or add to the test session.
 - Click Save or Save & Add Another to add another session.
Editing a Test Session by Adding or Removing Students
You can view existing test sessions to see which students are enrolled in them. You also can edit test sessions to add or remove students.
Note: This procedure describes the most efficient way to quickly set up walk-in testers.
- To view or edit a test session, click My Applications and Manage Test Sessions. The Test Sessions page displays.
- Click Show Sessions.
- When the test sessions display, click the View/Edit icon (
 ) in the Action column to display the Edit Test Session window for the session.
 - From the Edit Test Session window, click Find Students.
Note: To add a new or walk-in tester to the test session, enter the student’s name and/or student ID, then click Find Student. If the student is found, select the student name and add them to the test session.
If the student is not found, click the New Student button. The Add Student window displays. Enter the required information on the window and click Save. The new student displays in the Students in Session pane of the Edit Test Session window. - Select a student and double-click to edit the student’s information, or use the (), Remove Selected (), Add All (), and Remove All () icons with the Available Students and Students in Session lists to select one or more students to remove from or add.
Note: To select multiple students in sequence, press the Shift key, select the students, and click the mouse button. To select multiple students not in sequence, press the Ctrl key, select the students, and click the mouse button. - Click Save to save your changes or Cancel to cancel them.
Deleting a Test Session
You can delete a test session up until the time testing begins. If testing has started for any test in the test session, the session cannot be deleted.
- To delete a test session, click My Applications and Manage Test Sessions. The Test Sessions page displays.
- Enter your search criteria and click Show Sessions.
- Click the Delete icon (
 ) in the Action column for the test session you want to remove. The Confirm Delete dialog box displays.
Note: You cannot delete a test session if testing has begun. - Click Delete to delete the test session or Cancel to cancel the process.
Viewing and Exporting Test Session Status Details
The test session status display provides the following information: each student’s test ticket status; the time the student started the test; and the time the student completed the test. You can use this information to verify that all of the students in a session have completed their tests.
- To view or export the status of a test session, click the Edit/Print Ticket Status icon (
 ) from the Session Detail window in the Action column for the test session details you want to view or export. The details for the test session you selected display in the Testing Status window.
 - You can search for students on the Testing Status window by Last Name, Status, or Status by Module, which includes the Subtests in the test session. Enter your search criteria or select from the drop‑down menus.
- Click Filter to display the results or Clear to clear your selections.
- To export one or more test session statuses to a spreadsheet file (.xls) that you can save, view, edit, or print, check the Select checkbox next to each test session status you want to export and click Export to Excel.
Displaying a Test Session Status Summary
The Test Session Status Summary provides a summary report of the test sessions and the status of students (Not Started, In Progress, and Completed) of each Subtest for each TerraNova Form you specified when you displayed the Test Sessions window (see “Viewing and Exporting Test Session Status Details” on page 91.
- To display a Test Session Summary report, click My Applications and Manage Test Sessions. The Test Sessions page displays.
- Select your search criteria and click Show Sessions.
- Click the Status Summary tab.
- A Session Summary and Student Summary report displays for the test sessions displayed on the Test Sessions window (based on your search criteria).